
병호의 IT새싹키우기
Bank App 만들기 (deployment) - 23. 계좌 상세보기 .2단계(기능, 동적쿼리 구현) 본문
💡학습 목표💡
사용자 요청 list.jsp 에서 해당 계좌 번호 선택 - (list.jsp 링크 수정 해야 함)
- detail.jsp 만들기
- account/list.jsp 파일에 링크 추가 하기
- 계좌 상세 보기 기능 구현
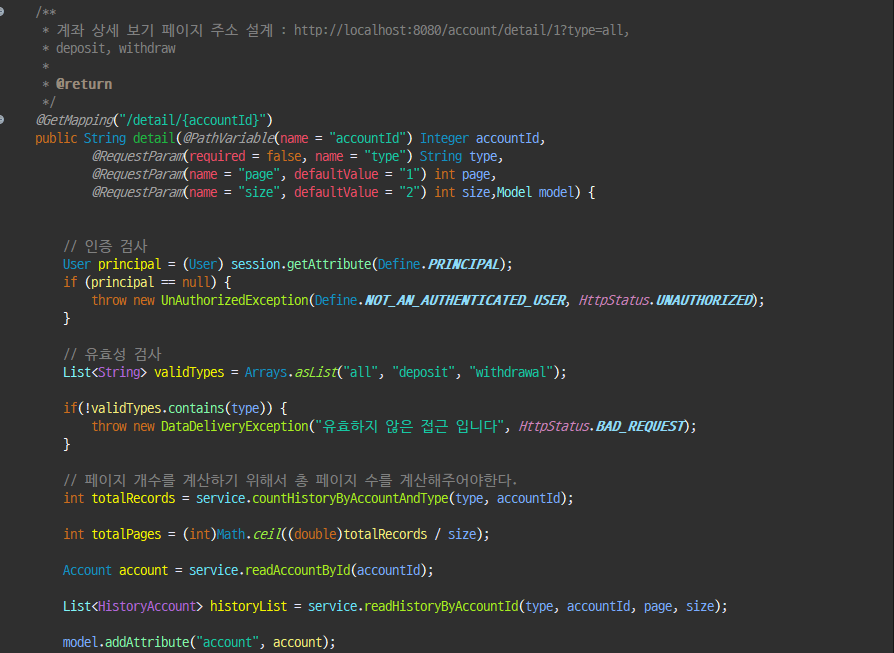
- AccountController 주소 설계 및 코드 추가
- 거래 내역 쿼리 확인 후 DTO 설계 - HistoryDTO
- AccountService 상세 보기 기능 구현 단일 계좌 검색 기능 추가 거래 내역 확인 기능 추가 (동적 쿼리 생성)
- utils/TimestampUtil 클래스 추가 - 시간 포맷 기능
- #,### 금액 단위 포맷 기능 추가 - HistoryDto 클래스에 기능 추가
코드상에서 사용할 쿼리 다시 확인
-- 코드상에서 사용할 쿼리 생성
-- 출금에 대한 쿼리 출력
-- receiver : 금액을 받는 대상,
-- 기능적으로 하나의 JSP 페이지에서 전체 쿼리에 대한 결과 집합에
-- 컬럼명을 동일하게 사용할 수 있도록 쿼리를 수정합니다 (같은 모델 클래스에 담을 예정)
-- 출금에는 AMT 출금, 1111 ---> 2222 이체
select h.id, h.amount, h.w_balance AS balance, h.created_at,
	   coalesce(cast(da.number as CHAR(10)), 'ATM')  as receiver,
       wa.number as sender
from history_tb as h
left join account_tb as wa on wa.id = h.w_account_id
left join account_tb as da on da.id = h.d_account_id
where h.w_account_id = 1;


-- 입금에 대한 쿼리 출력 ( AMT 입금, 다른계좌에서 --> 1111계 받거나)
select h.id, h.amount, h.d_balance as balance, h.created_at,
	coalesce(CAST(wa.number as CHAR(10)) , 'ATM') as sender,
    da.number as receiver
from history_tb as h
left join account_tb as wa on wa.id = h.w_account_id
left join account_tb as da on da.id = h.d_account_id
where h.d_account_id = 1;


-- 입,출금 전체 쿼리
select h.id, h.amount,
	case
		when h.w_account_id = 1 then (h.w_balance)
        when h.d_account_id = 1 then (h.d_balance)
    end  as balance,
    coalesce(cast(wa.number as char(10)), 'ATM') as sender,
    coalesce(cast(da.number as char(10)), 'ATM') as receiver,
    h.created_at
from history_tb as h
left join account_tb as wa on h.w_account_id = wa.id
left join account_tb as da on h.d_account_id = da.id
where h.w_account_id = 1 OR h.d_account_id = 1;

select * from history_tb
1. detail.jsp 만들기
계좌 상세 보기 화면은 계좌 목록 페이지에서 존재하는 하나의 계좌 번호를 선택했을 때 DB에서 데이터를 조회하고 결과를 화면에 출력해야 합니다. 한 번에 작업을 하면 어려움이 있을 수 있으니 기본 화면부터 만들고 기능을 추가하도록 합시다.
계좌 상세 보기 화면은 계좌 목록 페이지에서 존재하는 하나의 계좌 번호를 선택했을 때 DB에서 데이터를 조회하고 결과를 화면에 출력해야 합니다. 한 번에 작업을 하면 어려움이 있을 수 있으니 기본 화면부터 만들고 기능을 추가하도록 합시다.
샘플 화면 확인
Table 태그와 부트스트랩4 을 활용하여 약간에 CSS 를 추가 하겠습니다.

account/list.jsp 파일에 링크 추가 하기
<tbody>
	<c:forEach  var="account" items="${accountList}">
		<tr>
			<td><a href="/account/detail/${account.id}?type=all">${account.number}</a></td>
			<td>${account.balance}</td>
		</tr>
	</c:forEach>
</tbody>
AccountController

detail.jsp
<%@ page language="java" contentType="text/html; charset=UTF-8" pageEncoding="UTF-8"%>
<!-- heafer.jsp -->
<%@ include file="/WEB-INF/view/layout/header.jsp"%>
<!-- start of content.jsp(xxx.jsp) -->
<div class="col-sm-8">
<h2>계좌 상세보기(인증)</h2>
<h5>Bank App에 오신걸 환영 합니다</h5>
<div class="bg-light p-md5">
<div class="user--box">
${principal.username}님 계좡 <br> 계좌번호 : ${account.number} <br> 잔액 : ${account.formatKoreanWon(account.balance)}
</div>
<br>
<div>
<a href="/account/detail/${account.id}?type=all" class="btn btn-outline-primary">전체</a> <a href="/account/detail/${account.id}?type=deposit"
class="btn btn-outline-primary">입금</a> <a href="/account/detail/${account.id}?type=withdrawal" class="btn btn-outline-primary">출금</a>
</div>
<table class="table table-striped">
<thead>
<tr>
<th>날짜</th>
<th>보낸이</th>
<th>받은이</th>
<th>입출금 금액</th>
<th>계좌 잔액</th>
</tr>
</thead>
<tbody>
<c:forEach var="historyAccount" items="${historyList}">
<tr>
<th>${historyAccount.timestampToString(historyAccount.createdAt)}</th>
<th>${historyAccount.sender}</th>
<th>${historyAccount.receiver}</th>
<th>${historyAccount.formatKoreanWon(historyAccount.amount)}</th>
<th>${historyAccount.formatKoreanWon(historyAccount.balance)}</th>
</tr>
</c:forEach>
</tbody>
</table>
<br>
<!-- Pagination -->
<div class="d-flex justify-content-center">
<ul class="pagination">
<!-- Previous Page Link -->
<li class="page-item <c:if test='${currentPage == 1}'>disabled</c:if>">
<a class="page-link" href="?type=${type}&page=${currentPage - 1}&size=${size}">이전 페이지(Previous)</a>
</li>
<!-- Page Numbers -->
<c:forEach begin="1" end="${totalPages}" var="page">
<li class="page-item <c:if test='${page == currentPage}'>active</c:if>">
<a class="page-link" href="?type=${type}&page=${page}&size=${size}">${page}</a>
</li>
</c:forEach>
<!-- Mage Page Link -->
<li class="page-item <c:if test='${currentPage == totalPages}'>disabled</c:if>">
<a class="page-link" href="?type=${type}&page=${currentPage + 1}&size=${size}">다음 페이지(Next)</a>
</li>
</ul>
</div>
</div>
</div>
<!-- end of col-sn-8 -->
</div>
</div>
<!-- end of content.jsp(xxx.jsp) -->
<!-- foofer.jsp -->
<%@ include file="/WEB-INF/view/layout/footer.jsp"%>: 위 코드와 그림 상세보기에서 전체(all),입금(deposit),출금(withdrawal)은 같은 화면에서 사용자 선택에 따라 다른 결과 화면이 출력이 되어야 합니다. (동적 쿼리를 사용해서 구현 할 예정 입니다.)
AccountRepository에 추상 메서드 추가
💡 의존성 역전 원칙(Dependency Inversion Principle, DIP)에 대한 생각
프로그래밍은 현실 세계의 논리와 구조를 코드로 변환하는 과정이라고 할 수 있습니다. 이 과정에서 "인터페이스 중심 설계"는 중요한 개념 중 하나입니다. 이를 "역할과 구현"이라는 관점으로 이해할 수 있습니다. 예를 들어, "로미오와 줄리엣"이라는 연극을 생각해보면, 여기에는 '로미오'라는 역할이 있고, 이 역할을 수행하는 구체적인 배우가 있습니다.
"인터페이스로 설계한다"는 것은, 역할(인터페이스)은 정의되어 있지만, 그 역할을 구현하는 구체적인 주체(구현체)는 바뀔 수 있다는 의미입니다. 즉, '로미오'라는 역할은 동일하지만, 그 역할을 수행하는 배우는 변경될 수 있으며, 배우가 변경되더라도 연극은 계속해서 진행될 수 있습니다. 이는 소프트웨어 설계에서 인터페이스를 통해 '역할'을 정의하고, 이를 다양한 '구현체'로 실현할 수 있음을 의미합니다.
AccountRepository - 역할(추상메서드 추가)

account.xml - 구현 : 파일 하단에 쿼리 구문을 추가해주세요 (resources/mapper/account.xml)
	<select id="findByAccountId"  resultType="com.tenco.bank.repository.model.Account">
		select * from account_tb where id = #{accountId}
	</select>
HistoryAccount


history.xml

'Sprung boot' 카테고리의 다른 글
| Bank App 만들기 (deployment) - 25. 계좌 상세보기 페이징 처리 (1) | 2024.08.12 |
|---|---|
| Bank App 만들기 (deployment) - 24. 간단한 유틸 클래스 만들어 보기 (0) | 2024.08.12 |
| Bank App 만들기 (deployment) - 22. 계좌 상세보기 .1단계(쿼리 학습) (0) | 2024.08.12 |
| Bank App 만들기 (deployment) - 21. 이체 기능 만들기 (1) | 2024.08.08 |
| Bank App 만들기 (deployment) - 20. 입금 기능 만들기 (0) | 2024.08.08 |


